Racket
This section gives a concise overview of the subset of Racket we will be using for this course. As we see more features of Racket, this document will be expanded to cover the new features. See From OCaml to Racket for a tutorial introducing Racket.
1 Getting Started
Racket is available for all major operating systems from:
Racket is also available on the GRACE computing cluster at UMD. The executables are located in
/afs/glue/class/fall2019/cmsc/430/0101/public/racket-7.4/bin/
For convenience, you can add the following line to your .cshrc.mine file so that this directory will be added to your PATH environment variable:
setenv PATH ${PATH}:"/afs/glue/class/fall2019/cmsc/430/0101/public/racket-7.4/bin/"
The next time you log in, you should be able to run racket or drracket from the command line without typing out the directory. (Note: you will need X11 forwarding to use DrRacket or other GUI applications.)
We will be using Racket 7.4, but any version from the past several years should work fine.
There are two essential references:
The Racket Guide - intended for those new to Racket, i.e. you!
The Racket Reference - the definitive, comprehensive manual for Racket
Racket is a large, full-featured, batteries-included language platform. However, we will be using only a small subset of Racket. This subset should be easy to pick up for anyone familiar with functional programming. If you’re comfortable with basic OCaml, Haskell, or even JavaScript, you shouldn’t have much trouble learning the Racket bits we will be using.
2 IDE
Racket comes with it’s own IDE: DrRacket, which is the recommended way to edit Racket files. We will also be running Racket and its associated tools from the command line.
If you’d like to use Emacs, there’s a good Racket mode, but we recommend using DrRacket for a while before switching to Emacs. Using any other editor is fine, too.
3 Racket for Windows 10 Users
For Windows 10 users, using WSL for testing is highly recommended. Beyond the first few assignments, the projects will require generating and executing assembly code using the nasm package. Students in the past have had trouble trying to configure this in the Windows environment, so an easier workaround is simply to enable WSL and run your tests through some Linux Distribution. Here is a breakdown of the steps:
Following the instructions at this link, install a Linux Distro of your choice (e.g., Ubuntu). The instructions include a suggestion to upgrade to WSL2; this is not necessary but will improve efficiency in general.
Open your installed Linux distribution of choice and make any initial configurations necessary (user, pass, etc.). Run ’sudo apt update’ and follow with ’sudo apt upgrade’. These two may take some time.
Run ’sudo apt install racket’ and ’sudo apt install nasm’. These two should cover the necessary installations for this course.
Here is where to determine which IDE you would like to use.
Using vim (or Emacs as mentioned in the previous section) is simple. Git clone project repos into WSL. Modify files.
Previous students preferred installing VSCode (outside of WSL) from this link. For each assignment, git clone somewhere on your Linux distro. For some .rkt file, call ’code some-rkt-file.rkt’ and after some automatic set up, VSCode should load up the file. Install Racket extensions from the VSCode Marketplace (a suggestion will also pop up once you open a .rkt file) to have colorized syntax, bracket matching, inteliSense, etc.
If you are intent on using DrRacket, you would also need to install Racket on your local machine (outside WSL). For each assignment, git clone into your normal file system and use DrRacket to edit files accordingly. To access from your Linux subsystem, create a soft symbolic link in your Linux distro to the project directory (or the parent directory so you do not need to make links with each new project).
Regardless of the IDE used, you can now run your tests from your Linux subsystem by entering the project directory and using the raco command.
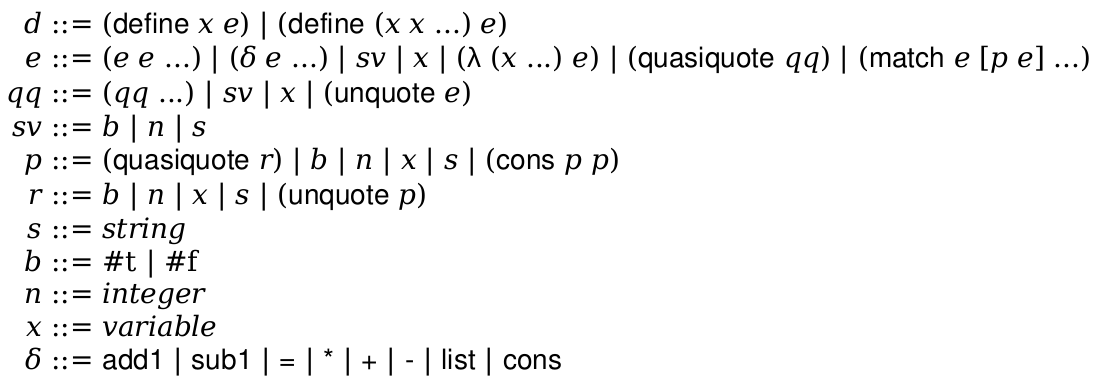
4 Grammar
A program is a sequence of definitions or expressions.
The grammar for the subset of Racket we will use is:
5 Built-In Datatypes
We will use:
Booleans
Numbers
Strings
Symbols
Pairs and Lists
We will make extensive use of quote.
6 Definitions
A definition takes the form:

A definition 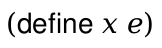 defines
  to stand for the value produced by evaluating
  .
.
The  form is shorthand for
 .
.
7 Examples
Here are some examples of writing various functions in our subset of Racket.
; compute the product of a list of numbers
> (define (prod xs) (match xs ['() 1] [(cons x xs) (* x (prod xs))])) > (prod '(1 2 3 4 5)) 120
; reverse a list
> (define (rev xs) (rev/acc xs '()))
> (define (rev/acc xs a) (match xs ['() a] [(cons x xs) (rev/acc xs (cons x a))])) > (rev '(1 2 3 4 5)) '(5 4 3 2 1)