Preliminary Material
Project 0 is worth 3% of your grade.
This project deals with a vector, implemented as non-circular singly
linked lists and an iterator to traverse the SLL.
- container class - a class that can store a large amount of data
and has operations to access, insert and remove items from the container. - vector - a data structure that has the ability to grow and shrink
dynamically and allows direct access to elements using indexing - iterator - a pointer-like object that accesses the elements
in a vector - forward iterator - can only move in the forward direction.
Purpose
This project reviews a non-circular singly linked list. It uses a the Vector class as the implementation. The goals of this project are to:
- Understand a non-circular singly linked list.
- Review and implement the C++ string class.
- Simulate the STL vector class and manipulate a vector.
- Understand and implement a forward iterator class.
- Understand and write unit tests for each class.
Academic Integrity Statement
Please note that *all* programming projects in this course (including this one) are to be done independently or with the assistance of the instructional staff of this course only.
Please review the policies outlined on the class syllabus concerning the use of class computer accounts and concerning the University's Code of Academic Integrity. The instructors of this course will review the programs submitted by students for potential violations of the Code of Academic Integrity and if it is believed that a violation has occurred it will be referred to the Office of Judicial Programs and the Student Honor Council.
Hardcoding is considered a violation of academic integrity
Style Guide
Students are expected to write "clear and legible" code. Please review the following Style Guide which specifies how students in CMSC 214 are expected to lay out their code:
http://www.cs.umd.edu/class/spring2004/cmsc214/styleguide.txt
FAQ
Answers to "frequently asked questions" will be posted via the main projects page. Prior to asking a question or submitting a project you should check the FAQ to see if any important information has been covered there. In addition to answers to FAQ's any important information pertaining to a project will be posted on it's FAQ.
E-mailing Questions
DON'T email questions. We cannot keep up with the numerous emails about a project. GO SEE A TA or an instructor during office hours. We will generally NOT respond to email questions about the project.
Project Overview
For this project you will be required, among other things, to write the code for 3 classes:
class 1: Node
class 2: Vector
class 3: Iterator
In the class posting accounts (~bt214001) you can find the headerfiles for the classes. The following rules MUST be adhered to:
- No public functions or (public, protected, or private data members) may be added to the header files.
- Your output must match our output, an example of which is provided in primary.output
- You may not change the input - as provided in primary.input
- Projects submitted after 2 days late will receive a grade of zero.
After copying the header files Node.h,Vector.h, and
Iterator.h into your account you should create the corresponding
Node.cpp, Vector.cpp, and Iterator.cpp files and
write the code that implements the member functions for these classes.
Note: you may NOT change the public methods
in the header files but may add private methods as needed. You
may NOT add private, public or protected data members.
In each header file you will find the class with it's data member(s)
and member function(s). There is a comment before/around each member
function describing what it should do. You are to implement (aka
write the code for) the member function so that it does what the
comment states that it should do and nothing more.
Next you should write 3 unit test files to test each of your classes:
- testNode.cpp
- testVector.cpp
- testIterator.cpp
A unit test file should be a main() for a particular class that
calls and tests each public method. It also tests the private
methods which are called from public methods.
Note that when developing/writing code you should do so in parts/modules
and test each as you create it (keeping backup copies!).
So for example, when writing Node, you also write a testNode.cpp
that is the main() for Node.cpp. It should call all public functions
and include appropriate output to test that all Node.cpp code
works correctly.
And finally you should test your code with the main supplied:
main.cpp
This main program uses the classes created earlier to obtain primary.output. You may *not* write any other classes.
Pictoral Example
Vector v after pushing the element "we" onto the empty
vector:
 v.size() returns 1
Vector v after pushing the element "are" onto the vector:
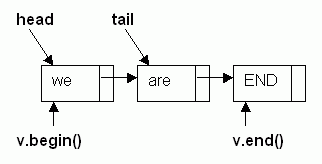 v.size() returns 2
Vector v after popping off all elements:
- v is NULL
- v.begin() and v.end() do not exist.
Note: v.end() (the dummy node) only exists if there is at least one valid element in the vector.
Assumptions
You may assume that
- The input will be redirected and be in a file called primary.input
- There may be multiple lines in the input.
- The input will not be empty. Each non-empty line will be followed by a newline (carriage return).
- The input will contain an EOF marker on the last line.
- Input may contain upper/lower case letters and white space as well as digits.
Hints
In order to mimic the STL vector class, we must work with end() which points to the node one past the end of the linked list. It is a dummy node containing "END" and NULL. It is used only for purposes of setting end(), and allowing for ranges from [begin()+i, end()).
Iterator arguments indicate a range [x,y) where x is included in the
range
and we go up to but do not include y. So for example if you were
executing erase(v.begin(),v.begin()+2) and the vector
was
v = we are here END (whose size is 3)
the resulting vector would be:
v = here END (whose size is 1)
Don't forget to change your finger information. Correct finger information is worth 5 points on your projects.
Sample I/O
You may assume:
- There are no blank lines in the input file.
- Each line terminates with a carriage return.
- The last line contains an EOF marker.
A primary input file and a primary output file are provided in the class posting accounts (in the appropriate directory). You should review these files. They will be named primary.input and primary.output respectively.
Your project will successfully submit if it passes the primary.input.
Your program should generate the corresponding output similar to
primary.output. Additionally, we will test several methods from your
code.
When our main.cpp is compiled and run with input redirected so that it gets the contents of the primary input file (primary.input) as input, it should generate output that matches the primary output file. When we test your program we will diff your output (using diff -bwi) with that of the primary output and if it does not match, your program will be considered to not meet the minimum running standards and you will be unable to submit it.
Passing primary does not guarantee a passing grade (70 or above) for your project. Testing your program thoroughly helps.
String Help
If you need review on the String Class a few good web sites are:
How to Submit
Logging in, setting up, and using your account
Note - Even if you are familiar with Unix, failure to follow these instructions as listed may result in your being unable to complete this assignment.
Log in to your class account using ssh, putty, or some other similar remote-login program (use telnet as a last choice). You should log in (connect) to the hostname dc.umd.edu and use your class login id (bt214xxx) and the password given.
Note that once you successfully log in a number of screens of information will appear. Continue to press 'q' (Q for quit) until you get to the UNIX prompt (% ).
At the UNIX prompt run the dce_login command to "authenticate" your login session (this is only needed when running the setup program and/or changing your password) - be sure to use your class login ID (as the "Principle Name") and then your password.
After authenticating your session run the following command:
~bt214001/setup
After running the setup program you should change your password (passwd) and then your finger information (chfn) - note failure to change your finger information may result in loss of points on this and future projects - you should at least modify your finger information so that it reflects your real name (other information you may leave blank). Do not put your nickname down for your finger information - it should be your first and last name. Note: it may take up to 24 hours for your finger information to take effect - that is normal.
Now log out and log back in and then your account will be successfully set up and you should see the current class announcments displayed when you log in. NOTE: to log out you will need to type exit and then give the logout command (logout) - you only need to do this (type exit) this time because of the "authentication" that the dce_login command did.
After logging back in you should practice using your account a little to become familiar with the computer system. Do NOT forget to log out when you are all done.
NOTE: the setup program "installed" various things and if you fail to run the setup program then you will not be able to submit your projects. Also the setup program modified cxx to automatically use the options -std strict_ansi and -w0 (by aliasing the command). So, at the unix prompt if you wish to compile a file you just need to type cxx and then the name of the file and it will automatically include the required options. HOWEVER, in a makefile you must explicitly use the two required options with the cxx command, because the makefile does not use the "aliased" command.
It is strongly recommended that you create a new directory in your account (name it P0 or something like that) and copy the files from the posting account's P0 directory over into your account so you can then use and edit them.
The Makefile
Provide a makefile that creates an executable file named p0 when the command make p0 is run.
Tar up all necessary files, such as source code, including:
- all .cpp files
- all .h files
- your makefile
submit p0.tar 0
Submit will start accepting project 0 submissions on or about 02/04/04.


