
Fun with Flags?
Objective
In this project you will extend your experience with conditional statements and logic as well as with loops, including some nested loops. You will also see more examples of writing static helper methods, and start to see more of how multiple classes can work together in a single project.
Overview
While there are several classes in this project, only the one named FlagMaker will have parts to be implemented by you. The others should not be modified by you in any way. The final product will draw stylized flags representing different countries or people or places and at different sizes as selected by the input from the console.
This project is a CLOSED project - please visit the course web page to refresh your memory of information regarding the open/closed policy for projects of this course.
Color Class
One of the classes you will make use of in this project is provided in one of the available Java graphics packages. It is the "Color" class, and it is part of a package called "java.awt". That means that any class that wants to use Color objects must begin with the following statement at the top of the file:
import java.awt.Color;
Using this, if you wanted to create your own reference to a Color object you could use a statement like the one below:
Color myColor = Color.BLACK; // myColor now refers to the color "black"
There are other ways to generate just about any color you could imagine, but the simple syntax shown above works for the provided colors and these are all that are needed for the flags: BLACK, BLUE, GREEN, ORANGE, RED, WHITE, YELLOW. In real life some flags are made from different variations of these colors but for simplicity's sake on this project we will use the provided Color constants.
Grid_3x5 Class
The Grid_3x5 class has been written for you. It is part of a package called "cmsc131_GridTools". That means that any class that wants to use Grid_3x5 objects must begin with the following import statement at the top of the file:
import cmsc131_GridTools.Grid_3x5;
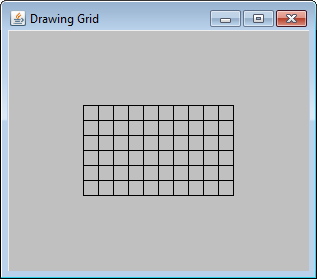
A Grid_3x5 object is a window that you can draw on. In the center of the window there is a rectangular grid (height to width ratio of 3:5). You can color in each region of the grid with any color you want. Below is an example of an "empty" Grid_3x5 object of scale 2 (that means the grid itself will be 6 high and 10 wide).
Creating a DrawingGrid Object
A Grid_3x5 object is created in the ExampleDriver provided for you in your CVS repository; if you need to create a new Grid_3x5 object in another driver, you could use a statement like this one:
Grid_3x5 aGrid = new Grid_3x5(2); //aGrid will refer to a 6 by 10 drawing grid
This statement will create a Grid_3x5 object referenced by a variable named aGrid where each of the 60 painting squares are colored gray.
Make sure you DO NOT create any Grid_3x5 objects in the methods of the FlagMaker class. These methods will be passed an already created Grid_3x5 object, and that is the only grid into which they should be drawing.
Coloring the Squares on the Grid
Once you have a Grid_3x5 object, you can color in any of the squares you want using any color you want. To do this, you use the method of the Grid_3x5 class called setColor. The setColor method of the Grid_3x5 class takes three parameters. The signature for the method appears below.
public void setColor(int row, int col, Color color)
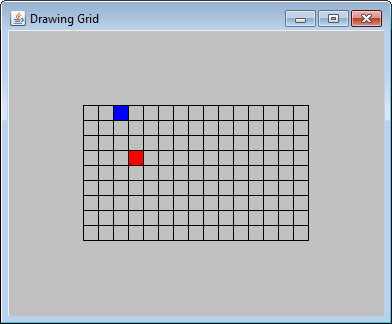
The parameters row and col specify the location of the square on the grid that you would like to color in; the parameter color refers to the color you want to use. Note that the first row is row number 0 (not row number 1), and the first column is column number 0. Also note that rows go across (side to side) and columns go up and down. For example, below is a picture of what you would see if you executed the code fragment that follows.
      Grid_3x5 aGrid = new Grid_3x5(3);   // creates a 9 by 15 Grid_3x5 object
      aGrid.setColor(3, 3, Color.RED);    // colors in the square at row 3, col 3, using red
      aGrid.setColor(0, 2, Color.BLUE);   // colors in the square at row 0, col 2, using blue
If a particular square on the grid has already been colored, there is no harm in re-coloring that same square -- the previous color will simply be replaced with the new color. This will be a very useful fact when you look for similarities between the flags so you can reuse code you have already written.
Determining the size of the Grid_3x5 object
There are two other methods of the Grid_3x5 class that you will need. Suppose you have a variable called "aGrid" that refers to an existing Grid_3x5, and you want to know how big it is. You can use the methods "getHt" and "getWd" to find out. The signature for these method appears below:
public int getHt() // the return value is the height of the grid
public int getWd() // the return value is the width of the grid
For example, if the variable "aGrid" refers to an existing 7 by 14 Grid_3x5 object, then the following expressions would be equal to the integer 7 and 14 respectively:
aGrid.getHt() //returns the value 7
aGrid.getWd() //returns the value 14
WARNING: Be careful - DO NOT USE getWidth() or getHeight() - these are defined but will not give you the numbers you are looking for.
FlagMaker Class
OK, this is where YOU come in! We have provided a skeleton for this class that you must complete. The drawFlag method must be in the FlagMaker class with the signature given. (A signature is what is described by the first line of a method definition - name, parameters, etc.) We have provided a starter version of this method and you will need to expand its logic to fulfill the project's tasks. In addition to writing one helper method per flag, you may find that writing additional methods can help to eliminate duplicative code. Since we will not be creating any FlagMaker objects, any methods you choose to write in this class should be declared using the keyword "static". Since these other methods will only be called from another method in the one class you are writing, it can also use the keyword "private" as you'll see in the example flag helpers we've provided.
The drawFlag method that you are working on has the following signature which must not be changed:
public static void drawFlag(Grid_3x5 grid, int flagCode)
Remember that the two parameters (grid and flagCode) are provided to your method by whoever called it. Those parameters contain the information that your method needs in order to do its job.
The parameter "grid" will refer to an existing Grid_3x5 object that has already been created by someone else. Your code should not create a Grid_3x5 object anywhere within the methods of the FlagMaker class, it is already provided! Your method will draw on the grid that is passed in via this parameter. You may assume that the grid starts off empty (all white squares).
The parameter "flagCode" will be an integer. The number should correspond to one of the flags listed in the menu of the ExampleDriver provided for you in your CVS repository (also corresponding to the numbers of The Flag Tasks Information Pages). If the value passed is not one of these values, your program should paint "the error flag" into the grid passed. The error flag is described in the linked file along with all of the flags. If the grid passed as the first parameter is not of a valid height for a flag corresponding to the flag code passed as the second parameter, the error flag should be painted into the grid passed as the first parameter. If the height of the grid passed is valid for the flag indicated by the flagCode passed, the flag will be painted filling the grid and matching the description in the linked file. Note: You will need to use the getHt and getWd methods on the grid passed to know its size.
The style for the flags must conform exactly to the examples and descriptions using the basic colors of the Color class (even though some are not exactly the accurate shade for the flag chosen).
The size of the grid can be determined by calling the "getHt" and "getWd" methods of the Grid_3x5 class. The size of the grid dictates the size of the flag you are supposed to draw (the flag must fill up the entire grid, as in the examples given.) If you are using the driver provided, the driver will get the input from the user, create the grid of the correct size, and pass that grid along with the flag code to the drawFlag method.
Examples and descriptions of flags
For examples and further descriptions of the flags, visit the Flag Task Descriptions Page. These are the exact style that you must use for drawing your flags. The linked file shows two examples for each flag so that you can see what it would look like in two different sizes. Your flag must conform exactly to what is shown and described in the linked file when the size is valid for that flag. The flag must take up the entire Grid_3x5 in the size it is passed. Your drawFlag method must be capable of drawing flags of any size that is appropriate for that flag (as defined in the linked file), and it must draw an error flag when appropriate.
Some forms of bad input are handled by the ExampleDriver which then passes a grid of the correct size and a flag code outside of those listed to the drawFlag method. For example: If the grid size given is not appropriate for the flag selected, an error flag needs to be drawn. The smallest flag scale allowed will be 2, so a grid that is 6 high by 10 wide; if a scale smaller than 2 is requested, the example driver creates a Grid_3x5 object of size 6x10 in which you will display the error flag. The maximum scale for any flag is 12; if a size larger than 12 is requested, the example driver creates a Grid_3x5 object of size 6x10 in which you must display the error flag. Since these limits are taken care of in the exampleDriver, you do not have to check it again in your code (you can read the exampleDriver for more explanation) - the example driver simply passes an invalid flag code so you know that the error flag should be displayed.
Please note that the ExampleDriver class is not part of the project assignment that you modify. It is only provided to help you test out your code. In fact, when we test your FlagMaker class ourselves, we will be using a completely different driver class. Feel free to write your own driver class to test your FlagMaker class a different way, if you want to, but make sure you don't alter things in a way that the provided driver no longer works.
Getting Started
Begin the project by "checking out" the project called Fall2019-Proj3. In order to help you get started, we have included a FlagMaker class with a skeleton version of the "drawFlag" method which you must complete. It also contains another method which is just an example "flag" - you can just delete this method when you don't need it anymore. Remember that you must have set up your repository in order to check out and submit projects. After checking out the project, when you switch back to the Java perspective, you will see the above files in the "Package Explorer" window, and you will be able to start modifying them.
If you write the project from scratch, without checking out the Fall2019-Proj3 files from your CVS repository, you will not be able to successfully submit and test your work.
Requirements
Suggestions
ELMS upload of Pseudocode and Trace
For this project the hand-written element is connected to the flag for Myanmar You are being asked to read the description of that flag and hand-write your algorithm for painting it into the grid and to then hand-trace that on an example size (perhaps a scale of 2). Once you have done that, take a scan or photo of it and upload it to the ELMS assignment. Then turn what you've written into Java code and resume working in Eclipse. As before, if you notice you had an error or oversight in your handwritten pseudocode, you do not upload a modified version to ELMS, you just move forward and get it working in Java. The hand-written element is graded based on it reflecting that you've read the description and have made an honest attempt at writing and tracing an algorithm for it.
Project Submission
Submit your project from Eclipse by right-clicking the project folder and selecting "submit project". You may submit as many times as you want, and should be as you work on each task to test that you are passing our tests, since we use the grade of the submission that scores the highest on the automated tests, accounting for any late penalty of course. Each time you submit a version of your project, you should visit the submit server. There you can obtain limited feedback about how well your project is performing. The number of times you can run our release tests on your project (before the due date) is limited so the earlier you begin working on the project, the more opportunities you will have to see how your project performs on our release tests before the due date!
Tests
There are several public tests and several release tests for this project. The first of the public tests makes sure that you can draw an error flag correctly when someone requests a flag that is too big. If you are running the ExampleDriver, you should see this error flag when you request any flag but in a very large size (the error flag will appear in other situations as described on the Flag Information page). There will be 9 public tests, covering the first four tasks in various ways. Some will be trying many different sizes to make sure you are properly displaying the error flag when needed as well as displaying the flag correctly at other sizes. There will be 5 release tests for the remaining flags and some final tests of mentioned restrictions/cases. The release tests will test multiple sizes for each of the flags and appear in the same order as the flag descriptions appear in the linked flag description file.
Grading
10% for the handwritten ELMS upload
85% from the public and release tests
5% style assessment of avoiding redundant code (manually checked on your last submission)