1 Before the First Class
This page tells you everything to set up before the first lecture of CMSC 389A. None of it is hard, but some steps (GitLab accounts, SSH keys) have a delay built in, so do this early. Extension requests caused by not being able to obtain the first assignment will be denied.
The golden rule of this course: ASK AI WHEN STUCK. This is a course about developing software with GenAI, and your setup is your first chance to practice. If a command fails, paste the exact error message into Claude (or the Claude Code extension once you have it installed), say what OS you are on and what you were trying to do, and follow the conversation until it works. Only email the course staff if AI and the linked troubleshooting docs both fail you.
1.1 Checklist
By the first day of class you should have:
Installed Git, VS Code, the Claude Code VS Code extension, and Python 3.12.
An active Claude Pro (or higher) subscription for the duration of the semester.
A working UMD CS GitLab account whose username is exactly your directory ID.
SSH authentication set up between your machine and GitLab.
Project 0 checked out, cloned, and verified with ./public.sh.
A submission of Project 0 on Gradescope.
Read the syllabus, and Chapters 1 and 2 of Pro Git.
1.2 Install the Tools
Keep this short: install each tool the standard way for your OS, then
verify it from a terminal. Ask AI when stuck —
Git: Download from git-scm.com (macOS: xcode-select –install; Linux: sudo apt install git or sudo dnf install git). Verify with git –version. If you’ve never committed from this machine before, set your identity:
git config --global user.name "Your Name"
git config --global user.email "your_email@example.com"
WSL (Windows only): Install WSL with Ubuntu. All course work on Windows happens inside WSL, not PowerShell or CMD.
VS Code: Download from code.visualstudio.com. Windows users should also install the WSL extension. macOS users: install the code shell command so you can open VS Code from a terminal —
open VS Code, press Cmd+Shift+P, type "Install ’code’ command in PATH", and press Enter. Verify with code –version. Claude Code: You are required to have a Claude.ai subscription at least at the Pro level for the entire semester —
the free tier’s usage limits are not enough for daily coursework. See Anthropic’s pricing page and purchase a plan before the first day of class. In VS Code, open the Extensions panel (Ctrl+Shift+X / Cmd+Shift+X), search for Claude Code, and install the extension published by Anthropic. Sign in with your Claude.ai account when prompted. Verify by opening any folder in VS Code, pressing Ctrl+Shift+P / Cmd+Shift+P, and typing Claude — you should see Claude Code commands in the palette. (If the Claude icon doesn’t show up, you may need to trust the workspace.) Node.js 20: Check with node –version; if it prints v20.x.x you’re done. Otherwise, install via nvm (macOS/Linux, and inside WSL for Windows users):
curl -o- https://raw.githubusercontent.com/nvm-sh/nvm/v0.39.7/install.sh | bashClose and reopen your terminal, then:
nvm install 20
nvm use 20
nvm alias default 20
Verify with node –version (v20.x.x) and npm –version (10.x.x or higher).
Python 3.12: Download from python.org (or use your package manager, e.g. brew install python@3.12 on macOS; Windows users install it inside WSL with sudo apt install python3.12 python3.12-venv python3-pip). Verify with python3 –version and pip3 –version.
Docker Desktop: Download from docker.com. You won’t need it until Week 13, but install it now so there’s no scramble later. macOS: launch Docker Desktop from Applications and wait for the whale icon in the menu bar to go solid. Windows: requires WSL 2, which the installer sets up for you. Linux: install Docker Engine and the Compose plugin directly (not Docker Desktop) —
see the installation docs. Verify (Docker must be running) with docker –version and docker compose version.
1.3 Set Up Your GitLab Account
We use the UMD CS GitLab (not GitLab.com!) to distribute starter code and to collect your work. Log in ASAP so your account exists before the first assignment goes out.
One known quirk: GitLab sometimes appends a stray 1 to newly created usernames. Our grading scripts match on your directory ID, so check that your username is exactly your directory ID and fix it in Preferences if not. For example, if your directory ID is student but GitLab created student1, change it to student. (If your directory ID really is student1, you should have exactly one 1 at the end.)
1.4 Set Up SSH Authentication
Windows users: do all of this in WSL, not PowerShell/CMD.
Open a terminal and run (with your GitLab email —
terpmail or personal both work): ssh-keygen -t ed25519 -C "your_email@example.com"Press Enter to accept the default file location. If it asks whether to overwrite an existing key, press Ctrl-C —
you already have one. Choose a short passphrase; you will type it often, and a weak passphrase beats no passphrase. Print and copy your public key:
cat ~/.ssh/id_ed25519.pubGo to your GitLab SSH keys page, click Add a new SSH key, and paste it. It should look like ssh-ed25519 <hash> <your email>.
Optional: use ssh-add so you don’t retype the passphrase on every push/pull (Windows users: follow the Linux instructions in WSL; skip the hardware security key section).
If something goes wrong, ask AI first, and see GitLab’s SSH troubleshooting page.
1.5 Check Out Project 0
These steps apply to every project in the course.
Check out the project at cs.umd.edu/cmsc389a to create your repository (each project has its own link), then click the generated link to visit your repository page.
Windows users: clone into the WSL filesystem, not the Windows filesystem. Your path should not start with /mnt; run cd ~ first.
Create a course directory and clone with the SSH link (not HTTP), substituting your directory ID:
mkdir ~/cmsc389A
cd ~/cmsc389A
git clone git@gitlab.cs.umd.edu:cmsc389A/p0-YOUR_DIRECTORY_ID
You can also copy the SSH link from the blue Code button on your project’s GitLab page.
1.6 Verify Your Setup
Run each command below and confirm the expected output before the first lecture. Doing this now, rather than the morning of, is what the "do this early" warning at the top of this page is about.
Tool |
| Command |
| Expected output |
Git |
| git –version |
| git version 2.x.x or later |
Git identity |
| git config –global user.email |
| the email you configured |
Node.js |
| node –version |
| v20.x.x |
npm |
| npm –version |
| 10.x.x or higher |
Python |
| python3 –version |
| Python 3.12.x |
pip |
| pip3 –version |
| pip 24.x or higher |
Docker |
| docker –version |
| Docker version 25.x or later |
Docker Compose |
| docker compose version |
| Docker Compose version 2.x |
GitLab SSH auth |
| ssh -T git@gitlab.cs.umd.edu |
| a "Welcome to GitLab, @your-directory-id!" message, not "Permission denied" |
Project 0 cloned |
| ls ~/cmsc389A/p0-YOUR_DIRECTORY_ID |
| lists the repo contents |
Claude Code in repo |
| Open VS Code in the cloned repo and ask Claude: "What files are in this project?" |
| an accurate description of the repo contents |
If the Docker Compose command fails with "unknown command," try docker-compose version (older syntax); if that also fails, Docker Desktop isn’t running yet.
Then, from inside the cloned Project 0 directory, run the project-specific checker:
./public.shYou should see no errors, and it will create a p0.report file that the autograder processes when you submit.
Windows users: if you see /bin/bash^M: bad interpreter, first confirm you are in WSL and your path does not start with /mnt (if it does, delete the folder and re-clone in WSL). Then fix the line endings and rerun:
vim public.sh -c "set ff=unix" -c ":wq"
git config --global core.autocrlf input
./public.sh
Anything else fail here? Ask AI —
1.7 Submit to Gradescope
Push your latest changes with git add, git commit, and git push. (If you get an author identity error, run the git config commands it shows, with your GitLab email and name.)
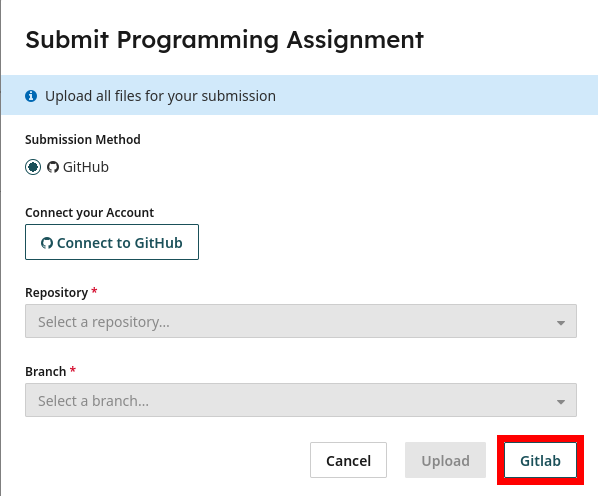
On Gradescope, click the project, then click GitLab at the bottom right of the popup window.
Sign in, then click Submit Project next to the project you want to submit.
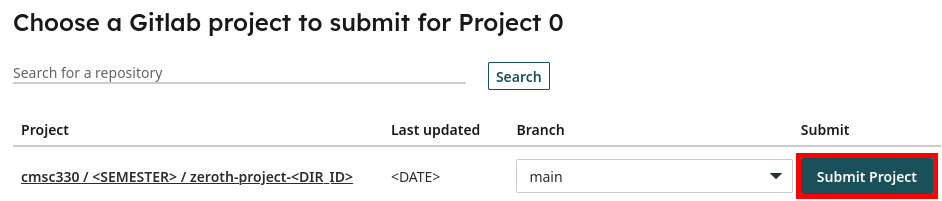
The timestamp shown may not be synced with GitLab; that’s fine —
1.8 Reading
Read the syllabus before arriving on Tuesday.
Read Pro Git, Chapters 1 and 2.