Graphs and Mazes
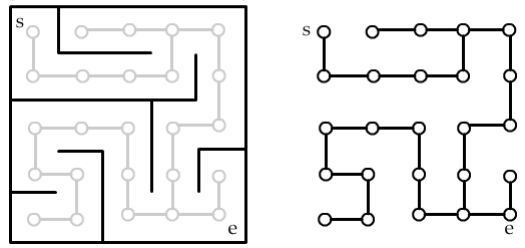
A maze can be viewed as a graph, if we consider each juncture (intersection) in the maze to be a vertex, and we add edges to the graph between adjacent junctures that are not blocked by a wall. Please study the picture above until you understand how a maze can be converted into a graph.
Our mazes will always have a starting point at the upper left corner and an ending point at the lower right corner.
Our mazes will have random weights (from 1 to 9) specified between any two adjacent junctures. (Sometimes these weights are not displayed on the screen, but they are always there.) These values can be thought of as the "cost" of traveling from one juncture to an adjacent one. The weights will be used for running Dijkstra's algorithm.
Our mazes can be made with varying degrees of "density" from very sparse to "100% dense". The more dense the maze, the more walls it has. A very sparse maze has very few walls at all; instead it has a lot of open space so that there are many different paths leading from one juncture to another juncture that is far away. On the other end of the spectrum, a maze with "100% density" contains lots more walls and has the interesting property that there is always exactly one path from one juncture to any other juncture in the maze.
The project will solve the mazes three different ways, by first converting the maze into a graph, and then applying one of the standard graph algorithms:
You will begin the project by writing a class called "WeightedGraph". This class is very general and could be used for any purpose. (It has nothing to do with mazes.) The WeightedGraph class represents a weighted, directed graph. The implementation will include methods for Breadth-First-Search, Depth-First-Search, and Dijkstra's algorithm. You may use whatever data structure(s) you choose to implement your WeightedGraph. See the Javadoc for specific instructions about the methods you must implement.
We have written a class called "Maze", which represents a Maze, and we have written a class called MazeGUI, which can display the maze in various ways. When you are finished implementing the project, you should try running the main method in the MazeGUI class to see your hard work put to good use! The GUI has buttons that will allow the user to re-draw the Maze as he/she likes, and to solve the maze in various ways. The MazeGUI class works in conjunction with a class you will write (described below) called MazeGraph. The MazeGraph class can convert a Maze into a graph. Before you begin working on the MazeGraph class, you should familiarize yourself with the API for the Maze class by reading the Javadoc.
The MazeGraph class is an extension of WeightedGraph<Juncture>, which is the class you wrote in Part I, where we choose to use "Juncture" objects as vertices. ("Juncture" is a simple class that we have provided.)
The constructor of the MazeGraph class will convert a Maze into a graph in the manner depicted in the picture at the top of this project description. If you view the maze as a rectangular grid of "junctures", then each vertex of the graph you will construct consists of one juncture from the maze. Two adjacent junctures will be connected by an edge if there is no wall separating them in the maze.
You only need to write the constructor for the MazeGraph class, which takes a Maze as a parameter and constructs the MazeGraph from it. The vertices of the MazeGraph will be Juncture objects. (Juncture is a simple class that we have provided.) Here are specific details about how to write the constructor:
The public tests, and release tests together will comprise 90% of your grade on the project. (There are no secret tests this time.) The remaining 10% will be "style grading", done by visual inspection. Be sure to use good variable names, proper indentation and use of braces, etc. Also be careful to avoid redundant code.