Exercise 2
Due: Tuesday, July 9, 11:59:59 PM EST.
(require 2htdp/image)
1 Directions for submitting
Please read and follow these intructions carefully. You should submit a single file named ex2.rkt on ELMS. You may submit many times, but each submission should be one file called ex2.rkt. You may lose points for not following these instructions.
;; Exercise 2 ;; Name: ...your name here...
2 Oveview

The goal of these exercises is to use the “arithmetic of images,” as provided by the 2htdp/image library, to construct an image that looks like the iconic Smiley, “a stylized representation of a smiling humanoid face that is a part of popular culture worldwide.”
An example of the desired result is given to the right.
construct elements of the smiley (head, eyes, smile)
compose those elements to create a smiley
Note: You’re solution doesn’t have to be identical to this one, but it should have all the same essential elements arranged in a similar manner. Your solution should also not involve any copy/pasted images. Everything should be constructed using the operations of 2htdp/image.
3 Deconstructing happiness
Before you begin, open a DrRacket window and actively read the documentation for circle, ellipse, rectangle, beside, overlay, image-height, image-width, and crop.
Actively read means more than just reading; it means reading, writing examples, playing, and experimenting as you go.
The smiley consists of a few distinct parts:
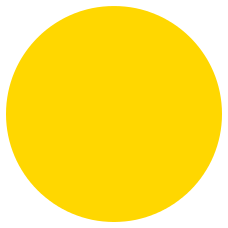
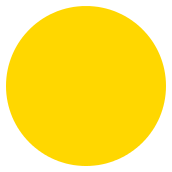
the head:

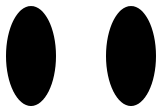
the eyes:

the smile:

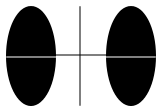
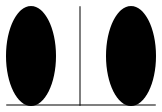
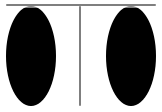
the eyes consist of two eyes (with space between them):

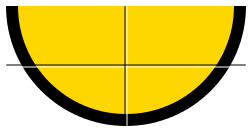
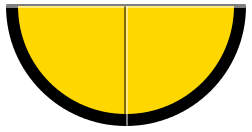
the smile can be constructed from two circles, overlaying them, and taking the bottom half:

Problem 1: Simple images
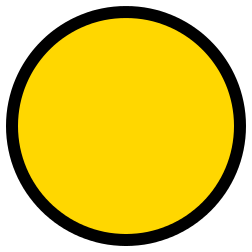
Using circle, ellipse, and overlay, write expressions that produce images that look like each of the following:
,
,
,
, and
.
Problem 2: Image helper functions
To help construct these images, complete the following helper function definitions, which have been stubbed for you:
;; hspace : Number -> Image ;; Create given amount of horizontal space as an image (check-expect (hspace 10) (rectangle 10 0 "solid" "black")) (define (hspace x) empty-image) ; stub ;; bottom-half : Image -> Image ;; Crop an image to just it's bottom half (check-expect (bottom-half (rectangle 100 60 "solid" "red")) (rectangle 100 30 "solid" "red")) (define (bottom-half i) i) ; stub
Now write expressions that produce each of the images show in this lab write-up. You may find hspace and bottom-half useful.
Problem 3: HEAD, EYES, and SMILE
Give three definitions that correctly define the head, eyes, and smile images:
(define HEAD ...) (define EYES ...) (define SMILE ...)
Problem 4: RADIUS
Define a constant RADIUS, which determines the radius of the smiley face. Reformulate the definitions of HEAD, EYES, and SMILE in terms of RADIUS.Use the following proportions to calculate the sizes of the other images:
The eyes should have a height of 2/3 * RADIUS, width of 1/3 * RADIUS, and space of 1/3 * RADIUS between them.
The smile should be constructed from a black circle that has a radius of 8/10 * RADIUS and a yellow circle that is 9/10 of that quantity.
Make sure that changing the value of RADIUS doesn’t break your program and produces a smiley image that is consistently scaled up or down.
Experiment with different values for RADIUS and observe the results.
4 Dancing on a pinhole
Now it’s time to put the pieces together.
You have already seen how to compose images using operations like above, beside, and overlay, but to construct the smiley, you’ll need more fine-grained control of where the peices line up.
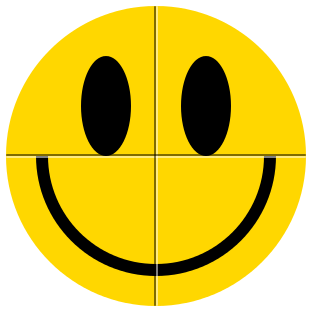
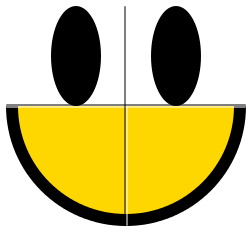
The image on the right is the smiley with some guide lines added. Notice that the eyes and smile are centered horizontally. Vertically, the middle of the head is aligned with the top of the smile and bottom of the eyes.
To easily align these images in this way we can use 2htdp/image’s notion of a pinhole.
Actively read the documentation for put-pinhole, center-pinhole, clear-pinhole, and overlay/pinhole.
Problem 5: Pinhole helpers
To help align images, complete the following helper function definitions, which have been stubbed for you:
;; center-top-pinhole : Image -> Image ;; Put pinhole halfway across and at top of given image (check-expect (center-top-pinhole HEAD) (put-pinhole RADIUS 0 HEAD)) (define (center-top-pinhole i) i) ; stub ;; center-bottom-pinhole : Image -> Image ;; Put pinhole halfway across and at bottom of given image (check-expect (center-bottom-pinhole HEAD) (put-pinhole RADIUS (* 2 RADIUS) HEAD)) (define (center-bottom-pinhole i) i) ; stub
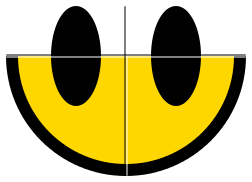
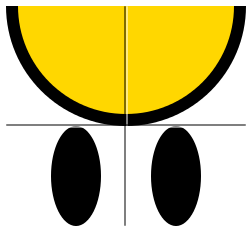
Experiment with your helper functions and built-in pinhole operations to produce each of the following images:
 ,
,
 ,
,
 ,
,
 ,
,
 ,
,
 ,
,
 ,
,
 ,
,
 ,
and
,
and
 .
.
Problem 6: SMILEY
Write an expression that produces the smiley image and define the constant SMILEY to refer to it.Example:
> SMILEY

5 All the Smileys
Congratulations! You’ve solved one instance of the Smiley problem. But suppose you wanted to produce two or more Smileys, each with a different radius? For example, maybe you want to make something like this:

In some sense, you have a solution to this problem: you can edit the definition of RADIUS and run the program to produce each of the Smileys involved in the image above. The problem with this solution is you need many programs to solve an instance of the problem.
A much better solution would be to have a single program that solves any instance of the problem. To do this, you need a function that can compute a Smiley image in terms of some given value for the radius.
;; smiley : Number -> Image ;; Construct a Smiley of given radius
> (smiley 20)
> (smiley 40)
> (smiley 80)


Of course, solving this generalization of the Smiley problem should also solve the particular instance of creating a Smiley of radius RADIUS:
> (smiley RADIUS)
> SMILEY


The definition of smiley is going to be very similar to the definition of SMILEY. In fact, you could start from the following stub:
;; smiley : Number -> Image ;; Construct a Smiley of given radius (define (smiley r) SMILEY) ; stub
The definition, like a broken clock, is sometimes right! In particular, (smiley RADIUS) produces the correct result, but every other input does not.
To see, take a look at your definition of SMILEY, which should involve uses of the constants RADIUS, HEAD, EYES, and SMILE:
(define SMILEY (... RADIUS ... HEAD ... EYES ... SMILE ...))
Take the right hand side of this definition and replace SMILEY in the definition of smiley:
;; smiley : Number -> Image ;; Construct a Smiley of given radius (define (smiley r) (... RADIUS ... HEAD ... EYES ... SMILE ...))
Looking at this sketch of the code, it should be clear we want to compute things in terms of r in place of the constant RADIUS. The constants HEAD, EYES, and SMILE are also defined in terms of the constant RADIUS, so want to develop functions:
;; head : Number -> Image ;; Construct a head image for a Smiley of given radius (define (head r) HEAD) ; stub ;; eyes : Number -> Image ;; Construct an eyes image for a Smiley of given radius (define (eyes r) EYES) ; stub ;; smile : Number -> Image ;; Construct a smile image for a Smiley of given radius (define (smile r) SMILE) ; stub
The correct code for smiley can now be obtained by replacing RADIUS with r, and HEAD with (head r), etc.:
(define (smiley r) (... r ... (head r) ... (eyes r) ... (smile r) ...))
You should be able to follow a similar process to obtain correct definitions of head, eyes, and smile. For example, in the case of head, replace HEAD with its definition:
(define (head r) (... RADIUS ...))
And replace RADIUS with r:
(define (head r) (... r ...))
You can check your work by comparing against known solutions:
> (head RADIUS)
> HEAD
> (eyes RADIUS)
> EYES
> (smile RADIUS)
> SMILE
> (smiley RADIUS)
> SMILEY


And you can cofirm it still works when the radius varies:
> (head 20)
> (head 40)
> (eyes 20)
> (eyes 40)
> (smile 20)
> (smile 40)
> (smiley 20)
> (smiley 40)

Having a function makes it easy to write programs that construct several Smileys of varying sizes:
> (beside (smiley 20) (smiley 40) (smiley 80))

Problem 7: smiley
Complete the following function definitions, which have been stubbed for you:
;; smiley : Number -> Image ;; Construct a smiley image of given radius (check-expect (smiley RADIUS) SMILEY) (define (smiley r) SMILEY) ; stub ;; eyes : Number -> Image ;; Construct an eyes image for a smiley of given radius (check-expect (eyes RADIUS) EYES) (define (eyes r) EYES) ; stub ;; head : Number -> Image ;; Construct a head image for a smiley of given radius (check-expect (head RADIUS) HEAD) (define (head r) HEAD) ; stub ;; smile : Number -> Image ;; Construct a smile image for a smiley of given radius (check-expect (smile RADIUS) SMILE) (define (smile r) SMILE) ; stub
Problem 8: Smiles
Write an expression that creates an image like the one at the beginning of this subsection.