Developing User Interfaces
CMSC 498B
Spring 2005
Prof. Ben Bederson
Project #5
Due May 12, 2005
The purpose of this program is to learn how to use Piccolo.NET, a 2D drawing toolkit, and to understand the creation of more complex controls.
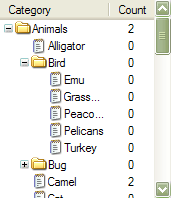
You must write a custom tree control from scratch using Piccolo.NET. The tree control must support multiple columns, use animation to show opening and closing of nodes, and the content must be specified with a TreeModel interface. An mockup of what your control might look like is:
The control must work as follows. Clicking on a plus sign must open that folder and display its contents, indented to the right. Clicking on a minus sign must close that folder, hiding its contents. All columns must be aligned. There should be a vertical scrollbar that shows a thumb proportional in size to the number of items. Let's look at each of these requirements separately.
You must use a Piccolo PCanvas as a base class for your tree control. Each graphical entity (i.e., open/control buttons, icons, and labels) must each be some kind of PNode. You will probably want to define your own custom node types in order to store application-specific data (see this custom ellipse node for an example).
You will have to write event handlers to respond to the user opening and closing tree nodes. Rather than write an event handler for every individual node (which will be quite inefficient), you should write one general event handler that extends PBasicInputEventHandler and add it to the Camera. You can read about how to do this in the Getting Started guide.
You do not need to support selection, but every item should be rendered with
an image. If the item has children, then use this folder image (![]() ),
and if the item is a leaf, then use this leaf image (
),
and if the item is a leaf, then use this leaf image (![]() ).
You can use these images by right clicking on them in your web browser and
saving them to your disk. Closed folders should be indicated by this plus
sign (
).
You can use these images by right clicking on them in your web browser and
saving them to your disk. Closed folders should be indicated by this plus
sign (![]() ), and
open folders should be indicated by this minus sign (
), and
open folders should be indicated by this minus sign (![]() ).
These symbols should be displayed to the left of the folder icon for folder
nodes. Clicking on a
).
These symbols should be displayed to the left of the folder icon for folder
nodes. Clicking on a
![]() should open
that node, and clicking on a
should open
that node, and clicking on a
![]() should close
that node (using animation as discussed below).
should close
that node (using animation as discussed below).
Your control must display a tree as defined by the following interfaces:
public interface TreeModel {
    TreeNode GetChild(TreeNode parent, int index);              // Returns the child of parent at index index in the parent's child array
    int      GetChildCount(TreeNode parent);                    // Returns the number of children of parent
    int      GetIndexOfChild(TreeNode parent, TreeNode child);  // Returns the index of child in parent
    TreeNode GetRoot();                                         // Returns the root of the tree.
    bool     IsLeaf(TreeNode node);                             // Returns true if node is a leaf
    TreeNode GetColumnHeader();                                 // Returns the single column header
}

public interface TreeNode {
    int    GetColumnCount();      // Get number of columns in this node
    string GetColumn(int index);  // Get specific column string within this node
}
Whenever the model of your control is set, it should immediately change its display to show the new model. By default, all nodes should be closed.
Your tree control must display multiple columns if any are defined by
GetColumnHeader(). If there are multiple columns, then your control must display
a header that looks something like this (![]() ).
This entire header should be one new custom node type that you render in order
to create the vertical lines and text, etc. The width of each column must
be just large enough to contain the column header labels. You can
determine this with Graphics.MeasureString(). (Note that the fact that
this method is slightly inaccurate is acceptable for this project).
).
This entire header should be one new custom node type that you render in order
to create the vertical lines and text, etc. The width of each column must
be just large enough to contain the column header labels. You can
determine this with Graphics.MeasureString(). (Note that the fact that
this method is slightly inaccurate is acceptable for this project).
Because the actual label of your nodes may well be longer than the allotted column width, you will have to clip your node text to fit within the width of each column. I suggest doing this by calculating the width of your column header, and then when you create your PText nodes for the individual tree nodes, only add as many characters as will fit (you will have to calculate how many characters will fit with Graphics.MeasureString() - do not rely on the number of characters, since the control may be displayed with a proportional spaced font.
Note that the indentation of the tree will result in the first column being pushed over to the right. This will work fine as long as your first column header is long enough. You can make this work by simply defining your application to have a long first column header string.
Whenever the user clicks on a
![]() to open a
closed node, first all the nodes below the node that was clicked on should move
down just enough to make room for the new nodes to be inserted. This
movement should be animated over 500 milliseconds. Then, the new nodes
should be added. Similarly, whenever the user clicks on a
to open a
closed node, first all the nodes below the node that was clicked on should move
down just enough to make room for the new nodes to be inserted. This
movement should be animated over 500 milliseconds. Then, the new nodes
should be added. Similarly, whenever the user clicks on a
![]() to close an
opened node, first all the nodes that are being closed should be immediately
removed. Then, the all the nodes below the newly closed node should be
move up to just below the current node with an animation that takes 500
milliseconds. There are many different ways you can animate things using
Piccolo, but for this animation, I suggest using the simple
PNode.AnimateToMatrix() method which will animate a node (and its children) to
the newly specified transformation.
to close an
opened node, first all the nodes that are being closed should be immediately
removed. Then, the all the nodes below the newly closed node should be
move up to just below the current node with an animation that takes 500
milliseconds. There are many different ways you can animate things using
Piccolo, but for this animation, I suggest using the simple
PNode.AnimateToMatrix() method which will animate a node (and its children) to
the newly specified transformation.
Learn about Piccolo.NET. Start by visiting the web page and reading the Piccolo Patterns document. Then, go through the examples in the Getting Started guide. Finally, as you get going, take advantage of the API documentation.
I recommend that start by spending a few days playing around with Piccolo.NET. You might try to get started by building the following simple application using Piccolo.NET. This should not be turned in, and will not be graded - it is just to help you learn Piccolo. Create a simple game that is essentially a one-dimensional version of the puzzle you built for project 2. Create a bunch of rectangles that are laid out horizontally with one special rectangle that indicates the "empty" spot. Clicking on any rectangle should slide (with animation) the rectangles between the one you clicked on and the empty spot towards the empty spot. Then, that special "empty spot" rectangle should move to the location you clicked. Here is a solution to this problem (but I strongly encourage you not to look at it until you have tried to do this yourself.)
Each Piccolo node has a method that gets called whenever that node's children need to be laid out. This method - PNode.LayoutChildren() - is essentially equivalent to a Windows Form Control's Layout event. You can override LayoutChildren() and put code there that you want called whenever your content needs to be re-laid out.
Piccolo has support for providing scrollbars that will automatically get created to let users access all objects in the scene graph. You can use this PScrollableControl component by referencing the piccolox DLL and using the UMD.HCIL.PiccoloX.Components package. Then, instead of creating a canvas and using it, do the following:
PScrollableControl sb = new PScrollableControl();
canvas = new PCanvas();
canvas.Bounds = new Rectangle(0, 0, 200, 200);  // Set whatever bounds you want here
sb.Canvas = canvas;
this.Controls.Add(sb);   // Add the scrollable control to the Form.
You will probably want to turn off Piccolo's default event handlers, since this application does not pan or zoom. You can do so by executing the following two lines of code:
canvas.PanEventHandler = null;
canvas.ZoomEventHandler = null;
Submit following the same rules as Project #4, but make the subject line of your email contain "DUI: Proj #5 submission". As before, any submissions after the deadline will be ignored. If multiple submissions are made, then only the last one before the deadline will be looked at.
The zip file must be called "proj5-<name>.zip" and must contain its files within a directory named "proj5-<name>" where you replace <name> with your last name.