AGIL
ACTIVE GLUCOSE INSULIN
CONTROL SYSTEM





Our design consists of an integrated insulin pump and continuous glucose monitor. This design allows total blood sugar control with a single device. With the ability to continuously monitor insulin, users are able to monitor their own health to an extent not commonly available today. This produces the opportunity for the system to demonstrate a very high level of responsiveness, leading to more engaging user interaction. Since the ability to deliver insulin is built into the device as well, the user can respond quickly to any problematic situations that arise, before they become dangerous.
For the device platform, we chose the PocketPC, because it has features that allow us to build advanced functionality into the design. It is a small, portable device, and so is reasonable for users to carry with them at almost all the time, a fundamental requirement for the device. It features a 3.5” or 3.8” color screen, which enables the display of meaningful information more easily, such as charts and graphs. It has the ability to produce sounds and sometimes vibrate, two features essential to the notification system. Finally, it supports a range of wireless communications, meaning it can send messages and medical information to doctors or emergency personnel, phone these interested parties, and also communicate wirelessly with the pump itself, encouraging further user interaction with the device.
The main goal of our design was to provide an interface direct enough to make the user feel in control of their own health, simple enough to make frequent interactions consume minimal time and stylus presses, and powerful enough to deal with the full array of situations users will encounter in their lives. Diabetics lead full and rich lives, and this device would be a near constant part of them, being used at every meal, waking up and going to sleep, and whenever physical activity levels change. Some diabetics, such as former Baltimore Orioles pitcher Jason Johnson, a long-time proponent and user of the insulin pump, have even become professional athletes.
To maintain internal locus of control, our design avoids automation and judgment of the user. It does not work as an artificial pancreas, dynamically calculating insulin delivery rates in a way that would be inaccessible to the user. The user determines when to deliver bolus insulin and how much to deliver, exposing the simple calculations needed to compute this value so the user knows exactly why the calculated amount is being delivered. For basal rates, the user sets the current rate and must specify whether to use the only automatic rate change available in the design, the switch from morning rate to the normal waking rate.
During setup, the user and their doctor specify exactly how the device should respond to a variety potentially dangerous situations, leaving no surprises when such a situation arises. When blood sugar levels leave the target range specified by the user, the device presents the relevant numbers to the user and suggests possible courses of action. This means that the device allows the user to make an informed decision based on information provided by the user and the facts of the current situation, rather than having to trust the machine’s problem solving abilities. There are no judgmental messages such as “You need to monitor your levels more closely,” but rather simple visualizations that make evident the user’s success in keeping their levels where they want them to be.
Finally, our design allows for both the intuitive level of interaction needed for early users and the faster but less self-evident expert interactions. Expert features and shortcuts are important in this device because users will do the exact same few tasks (such as eating a meal) every day, more than once a day. For this reason, we have incorporated one-finger navigation into the two most commonly used screens, the bolus dose (Eat a Meal) and basal rate (Change Schedule). This feature is explained more in the tutorial/help subsection at the end of this section.
Transition Diagram
Yellow: Setup, Green: Main Functions, Red: Advanced Functions

High Fidelity Screens - General Device Features
Main Screen
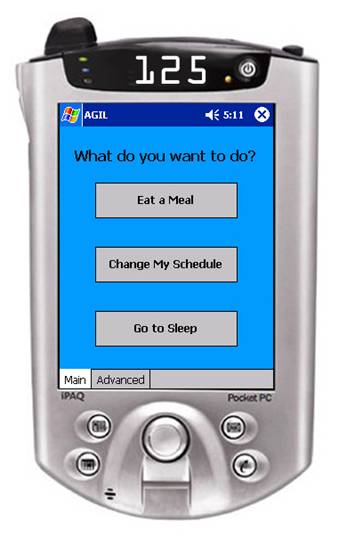
The simple LCD screen above the main screen shows the user’s current glucose level. This display remains on even when the main screen is turned off, so that the most important monitoring information is immediately visible at all times. This also means that the user can access this information at any screen of the interface, so that the user will not need to switch screens just to obtain this piece of information.
In developing our design, we felt it was important to actually use the interface on a real PocketPC, so that we understand and take advantage of aspects of the device design. This was part of our inspiration for the one-touch designs. While complexity is often measured in stylus presses, this approach leaves out some important factors: the removal and replacement of the stylus take time, and even the simplest text input is complicated by the cramped on-screen keyboard, which is a fixed part of the system. The text input methods on the device are all prone to error (the keyboard because of small keys, the text recognition systems because of inaccuracy). Since the interactions on the main screen are all intended to be quick interactions that begin and end with the device off, the natural consequence of all of these factors is the following principles:
1. Make all interaction possible either with the directional-pad or finger.
2. Make data entry and selection possible without using the stylus. For numeric data, this meant using spinner controls which can be changed with the d-pad. For other data, selection from a combo box or list box is used.
These principles for the main programs mean that the user never has to even remove the stylus for these tasks. It also gave rise to a clear distinction between novice interaction and expert interaction.
This screen shows the three functions of the interface that will potentially need to be used on a daily basis: Eat a Meal, Change Schedule and Go to Sleep. Each of these buttons corresponds to an action that the user wants to perform, so their purpose is clear. These buttons are designed to be reliably pressed with a finger or thumb, so they are large and far apart. All of the functions linked to on this page can be navigated without using the stylus, so it is important that this screen be navigable without it as well. The ‘Advanced’ tab at the bottom switches to the advanced feature set. For the other screens we will only show the actual device screen, because the device layout remains constant.
|
Begin - Setup
Screen |
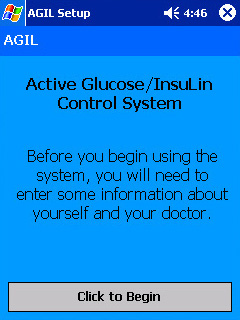
This screen simply ensures that the user is in consultation with their doctor during setup, so they will be able to obtain any necessary medical information. |
|
Setup: Personal
Info |
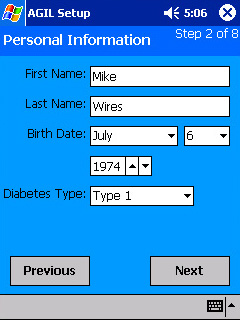
This screen records the users personal information, so that if an emergency alert is ever necessary, this information can be transmitted automatically to medical personnel. It also enables it to be included in general messages to doctors. |
|
Setup: Doctor’s
Info |
This screen records the doctor’s information, so that the user does not need to enter the doctor’s email address and phone number when attempting to contact them. |

|
Setup: Bolus
Formula |
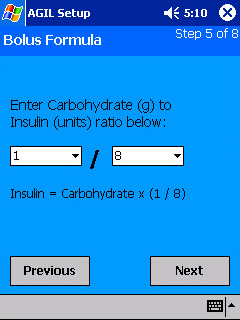
This screen allows the user to input their bolus formula, which is used to calculate the amount of insulin needed in a bolus based on the grams of carbohydrates eaten. Since the possible values are small for each number, not more than 10, we choose to use combo boxes instead of spinners. |
|
Setup: Basal Rates |
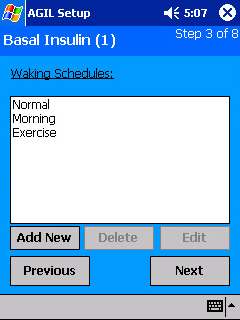
This screen displays the list of schedules, or basal rates, the user has added, and allows them to modify that list. Entering the schedules in this way enables the rapid selection of a basal rate by its associated name later on. |
|
Setup: Add Schedule |
|
|
|
|
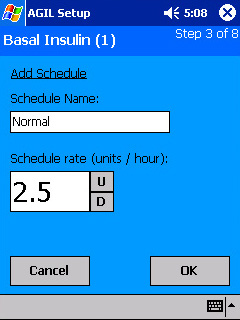
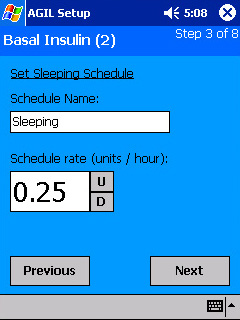
These screens allow the user to name each schedule, and enter a corresponding basal rate. On the sleeping schedule screen, the name defaults to “Sleeping.” The second screen is treated as a step in the setup process to emphasize the unique status of the sleeping schedule, but the respective buttons have essentially the same effect as they do on the first screen.
|
Setup: Levels |
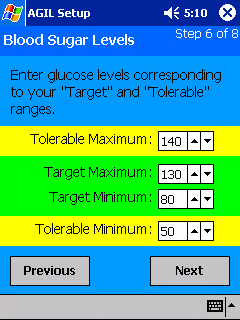
On this screen, the user enters the glucose levels the device will use to determine if an alert is necessary. The colored regions correspond to the colored regions in the graph screen. We considered using a pair of double-box sliders for this screen, but the device does not support that component, and we would have had to implement one from scratch. This would probably be worthwhile in a larger project, but not within the constraints we are under. |
|
Setup: Responses |
|
|
|
|
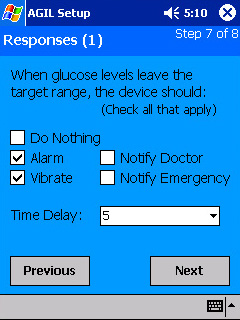
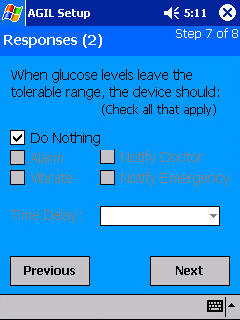
These screens allow the user to configure exactly how the device will respond when glucose levels leave the target or tolerable range. We used checkboxes because all of the options (except do nothing) can be enabled for a single event. The combo box is used to specify a time delay before the actions are taken.
|
Confirmation |
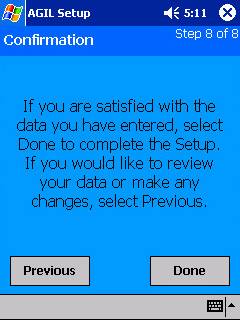
This screen simply presents a confirmation prompt to the user, letting them know they have completed the multi-part setup. |
|
Eat a Meal |
|
|
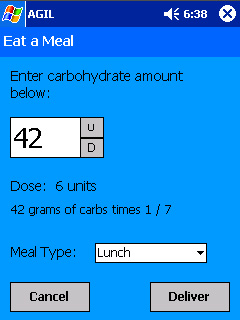
The information on the screen is presented in order of importance to the user. First, the amount of carbohydrates in the meal, the only numerical value the user has to modify. This is the only value the user has to “get right” on this screen. Reducing insulin delivery to this one number should make this screen cause less anxiety in users. Second, the insulin dose to be delivered is displayed and updated whenever the carbohydrate amount is changed. For users wanting to very the correctness of the dose, this and the third piece of data, the bolus formula, should be all that is needed to understand where the dose amount came from. This screen is one of the screens designed to be usable without the stylus, because eating a meal is such a frequent task. 1. Set the carbohydrate amount (Directional pad) – When the user enters the screen, the focus is set in the spinner control containing the amount of carbohydrates to be eaten. The user can change this number using the directional pad, up or down (the system prevents this number from going negative). 2. Set the meal type (Directional pad) – When the number is correct, pressing the d-pad in, which is the action button on the PocketPC, visibly moves the focus to the meal type combo box. Here the user can choose the meal type also using the d-pad. However, pressing the d-pad in will not deliver the insulin dose. This is a deliberate error-prevention mechanism. We do not want users to accidentally press the d-pad in too many times and deliver the wrong dose. 3. Press Deliver (Thumb) – Therefore, the user must actually press the Deliver button, which means consciously switching input methods to the thumb. After this is done, a confirmation dialog appears. 4. Confirm (Directional pad) – Because the OK button is automatically selected, pressing the d-pad will press it and deliver the dose of insulin, returning the user to the main screen. |
|
|
Change Schedule |
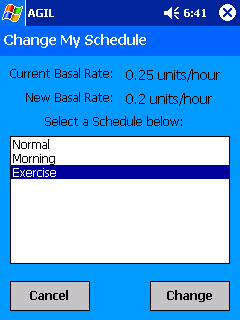
This screen is accessed from the main screen and allows the user to change their basal insulin delivery rate. Rather than directly entering the rate, users select from a list of names for schedules they entered with their doctor during setup. When the user selects a new schedule, the new basal rate, together with the old one, is displayed at the top of the screen. |
|
Advanced Features |
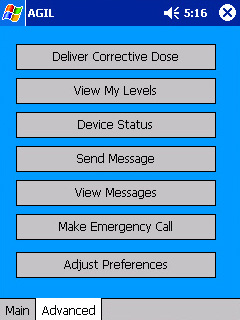
All of the advanced functions can be accessed from this screen. It is not designed for finger operation like the main screen is. |
|
View Levels |
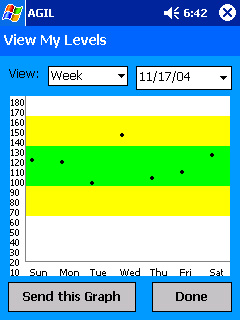
This screen presents the user with various views of their glucose levels over time, including month, week, and day. The colored regions correspond to the values set in the levels screen of setup. The combo box opens into a date picker. In a final version, the graph should be continuous, but this version served our purposes for testing. |
|
Send Message |
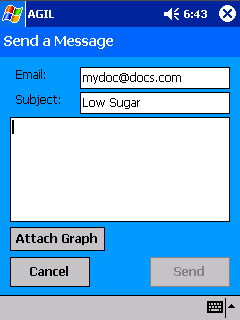
The message sending screen opens with the doctor’s email address already filled-in, so the user only has to be concerned with the message they are writing. The attach graph button links to the “View My Levels” screen, where the user can select a graph to attach to the current message. |
|
Emergency Call |
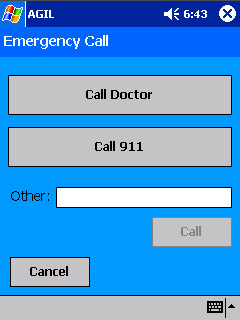
This screen provides three ways to call for help in an emergency: the doctor’s emergency number, provided during setup, a standard emergency number (911), and the option of typing in any other number if necessary. |
|
Notification |
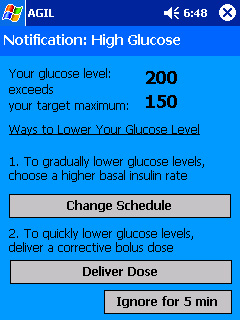
This screen appears when glucose levels rise above the target maximum. It appears regardless of what other alerts were enabled in the responses setup. It presents the information relevant to the situation clearly, and then suggests two courses of action to the user. If neither course is desirable, the user can choose to ignore the alert and seek to remedy the problem some other way. |
Tutorial
Below is the tutorial that was developed early on in the design process
to help the user with basic functionality of the software.
First Time User
The first time the unit is powered on and the software is run,
the user must set certain parameters, as well enter personal information.
It is expected that this will be done with the help of the user’s
physician. In the case of a minor, the parents would also be involved. The
first screen shown when AGIL runs is an introductory screen, with the
message Click to Begin. Once the user clicks, they will enter an
eight-step setup program that is detailed here.
1 – Personal Information
This screen
is where the user enters data about themselves, including: First Name, Last
Name, Birth Date, and Diabetes Type. The first two fields are filled out
using the onscreen keyboard, and the Birth Date and Diabetes Type fields are
filled out using a sequence of combo boxes. When finished, the user can
select Next to continue (this is true for all screens during setup.)
From this screen on until the setup is complete, the user will also always
have the option of selecting Previous to return to the previous
screen.
2 – Doctor’s Information
This screen is where the user enters data about their doctor.
There are five pieces of information that must be entered: First Name, Last
Name, Email Address, Office Phone, and Emergency Phone. These fields are
all filled out with the onscreen keyboard.
3 – Basal Insulin
On this screen, Basal Insulin(1) the user defines different
delivery schedules which can be activated throughout their day. The user
starts by selecting Add New to create the first schedule. A new
screen appears, prompting the user for the Schedule Name and Rate. When
done, the user selects Ok, and the screen returns to the list of
schedules. The user then has the option of selecting Add New to
create more schedules, selecting Edit to modify previously created
schedules, or Delete to remove schedules. The user must create at
least one schedule before they may continue.
Once they
select Next, the user is shown the Basal Insulin(2) screen. Here the
user sets the name of the schedule they will use while sleeping, and the
corresponding rate.
4 – Daily Schedule
Here the user selects which schedule they want to use as their
default. If the user created more than one schedule, they also have the
option of choosing to use a different schedule when they first wake up in
the morning. If they do so, they also set how long they want this schedule
to be in affect before switching to the default schedule.
5 – Bolus Formula
On this screen, the user enters the ratio that will be necessary
for the software to later calculate Bolus dosages for the user. Later, the
user will be able to enter the amount of carbohydrates in the meal they are
consuming, and the software will use this data along with a formula to
calculate the correct amount of insulin to deliver.
6 – Blood Sugar Levels
At this step, the user must enter blood-glucose values that will
correspond to the status light (see the next section). There are four
necessary values: max and min “target” values, and max and min “tolerable”
values.
7 – Responses(1)
On this screen, the user selects what action they want AGIL to
take when their blood sugar level leaves the Target range defined on the
previous screen. If they choose anything other than “Do Nothing,” they must
also select a time delay for the appropriate responses.
8 – Responses(2)
On this screen, the user selects what action they want AGIL to
take when their blood sugar level leaves the Tolerable range defined in step
six. If they choose anything other than “Do Nothing,” they must also select
a time delay for the appropriate responses.
Confirmation
Once the user has completed the eight steps of setup, they are
asked to confirm that the data they entered throughout the setup process is
correct. If they select Done, their information is saved, and they
are taken to the Home Screen.
Status Pod
A device will plug into the top of the Pocket Pc that will
display the current Blood-Glucose level, alongside a general status light.
If the user’s blood-sugar level is within the target range that they have
set, the light will be green. This allows the user to simply glance at the
unit to tell them quickly if there is a problem. If the light is green,
they need not even look at the actual number if they don’t want to. The
light will turn yellow when the user is in their tolerable range. If the
user is outside their tolerable range, the light will be red. The unit will
respond in different ways to these various light changes depending on the
preferences of the user.
The other main purpose of the Status Pod is to allow the Pocket
PC to be powered down to keep from wasting batteries. The Status Unit will
run on its own power supply, and being that its display is a simple LCD
screen and LED light, will consume power at a much slower rate then if the
entire Pocket PC was on. The Status Unit in conjunction with the Glucose
Pump will continue to deliver insulin at the current basal rate while the
main unit is off.
Home Screen
The Home screen is by default where users will start when they
power on the unit. From the Home screen, the user can select from two tabs:
Main and Advanced. The Main tab contains the following options:
- Eat A Meal
- Change My Schedule
- Go to Sleep
The Advanced tab contains the following options:
- Deliver Corrective Dose (Not Implemented)
- View My Levels
- Device Status (Not Implemented)
- Send Message
- View Messages (Not Implemented)
- Make Emergency Call
- Adjust Preferences (Not Implemented)
Eat a Meal
First, the user enters the carbohydrate count of the food they
are consuming using a spinner. The screen shows the user’s bolus
calculation ratio at the bottom of the screen, and dynamically updates the
actual insulin amount that will be injected as the user sets the spinner.
Then, the user selects what meal they will be eating from a drop down box.
The selections are: Other, Breakfast, Lunch, or Dinner. The user can then
select Deliver, and must then confirm the amount of the injection.
If they select to Confirm, the insulin is delivered through the
insulin pump. This entire screen can be manipulated with one finger. At
any time, the user can Cancel to navigate back to the Home screen, as
they can on any of the following screens.
Change My Schedule
This screen displays the current basal schedule name and rate in
a list box, along with all the other schedules the user has setup. Changing
the schedule is done by selecting a new schedule, then clicking Change.
Go To Sleep
Selecting this button causes the unit to switch between your
current delivery schedule and your sleeping schedule. A message appears
letting you know the unit is in Sleep mode, and displays a button to click
to return to Waking mode.
View My Levels
On this screen, the user selects a date, and then from a combo
box: Day, Week, or Month. The appropriate graph is then shown, displaying
the user’s past blood sugar levels. A button at the bottom of the screen
can be used to attach this data to an email, which can then be sent to the
user’s doctor.
Send a Message
On this
screen, the user can send their doctor a simple email, which can include
text and/or graphs. A “To” field is shown, already filled out with the
doctors email address, but which can be modified if necessary. The user can
then fill out the subject and message box with the onscreen keyboard, or by
writing freehand with the stylus using the PocketPC’s transcriber. They can
also select the Attach Graph button, which takes them directly to the
View My Levels screen where they can select a graph to attach. Finally, the
user can select Send or Cancel.
Make an Emergency Call
Here the user can select from two buttons: Call Doctor, or Call
911. There is also a field they can fill out to manually call a number not
listed.
Notification System
If a notification appears, the user has the option of delivering
a corrective dose, changing their schedule, or ignoring the warning.