Parallel Computing (CMSC416/CMSC616)
Assignment 4: CUDA
Due: November 12 18, 2025 @ 11:59 PM Eastern Time
git pull --force before you start working on this assignment. We have made some changes to the starter code.
The purpose of this programming assignment is to gain experience in writing GPU kernels. This assignment is split into two different problems. Applying image effects to videos is for CMSC416 students. The 2D Stencil problem is for CMSC616 students.
Video Effects (CMSC416)
Serial Algorithm
In this version of the assignment, you will implement convolutions with image kernels on a video file. Image kernels are used for blurring, edge detection, and other effects. An image kernel is a square matrix which is applied to each pixel in an image. It is applied by setting the pixel to the dot product of its neighbors and the image kernel. Wikipedia and this visualization contain further reading.
For example, if k is a 3x3 kernel, then pixel i, j of img would be computed as
        new_img[i][j] = img[i-1][j-1]*k[0][0] + img[i-1][j]*k[0][1] + img[i-1][j+1]*k[0][2] +
                        img[i][j-1]*k[1][0] +   img[i][j]*k[1][1] +   img[i][j+1]*k[1][2] +
                        img[i+1][j-1]*k[2][0] + img[i+1][j]*k[2][1] + img[i+1][j+1]*k[2][2]
The same pattern can be extended for kernels of size 5x5, 7x7, ... In this assignment you will apply a kernel to each pixel of each frame in a video. The pixels are in BGR format. You should convolve each color channel independently. Additionally, border pixels will be ignored.
GPU Algorithm
Your task is to implement this procedure on the GPU. We have provided starter code to handle reading/writing the video file (driver.cpp) and moving data on/off the GPU (video-effect.cu). You need to implement the convolveGPU kernel in video-effect.cu. A serial implementation of this algorithm is provided in the convolveCPU function. driver.cpp contains code to read/write the video and does not need to be edited.
The GPU kernel is structured as follows:
        __global__ void convolveGPU(float const* in, float *out, int width, int height, float const* kernel, int kernelWidth, int kernelHeight) {
                /* your code here */
        }
in is the video frame you are convolving. out is the frame you are storing results into. The frames are in packed BGR format (see the convolveCPU example for how to read each color channel). width and height give the dimensions of the video frame. kernel, kernelWidth, and kernelHeight provide the image kernel. You can assume the kernel is square with an odd dimension >= 3.
convolveGPU will be called with block size 8x8. You can change the block size with the blockDimSize variable. Your kernel should be able to handle when there are more pixels than threads available on the GPU (i.e. you need to implement striding).
Running
The starter code is setup to take an input video file name, output file name, and kernel name. The available kernel names are blur, edge, sharpen, and identity. You can also provide an optional frame number which will be dumped into a csv file. Dumped frames can be used to check for correctness. The command line arguments are:
./video-effect <input_filename> <output_filename> <kernel_name> <gridSizeX> <gridSizeY> <optional:frame_number> <optional:frame_filename>
You can check your output for this video (download the 1920x1080 version). We provide the output for frame 100 with the edge kernel here.
To get a GPU in your sbatch job add the following setting to the top
#SBATCH --gres=gpu:a100_1g.5gb
A sample sbatch script can be found here.
If you use interactive jobs, then add the --gres=gpu:a100_1g.5gb argument when you run salloc.
For this code, you need to load cuda and opencv with module load cuda opencv.
Output
The program will write out a video file with _out appended to the base filename.
For instance ./video-effect video.mp4 blur will write out video_out.mp4 with the blur effect.
You can copy videos off of zaratan to view them.
Running ./video-effect video.mp4 edge 100 frame.csv will write the 100th frame into frame.csv. Your output should match forest-edge-100.csv.
The program will output to stdout:
          Total time: 3.221 s
          Frames processed per second: 80.039 frames/s
What to Submit
You must submit the following files and no other files:
video-effect.cu: file with convolveGPU implementeddriver.cpp: file with changes to the command line arguments implementedMakefilethat will compile your code successfully on zaratan when using nvcc. A Makefile is provided here. Make sure that the executable name is video-effect, and do not include the executables in the tarball.- You must also submit a short report (
LastName-FirstName-report.pdf) with performance results (one line plot). The line plots should present the execution times to run the GPU version respectively on the input file video.mp4 (for different block sizes). You can change the block size by changing the blockDimSize variable. In the report, you should mention:- how you wrote the kernel
- how was the initial data distribution done
- what are the performance results, and are they what you expected
LastName-FirstName-assign4), compress it to .tar.gz
(LastName-FirstName-assign4.tar.gz) and upload that to gradescope.
Feel free to try different videos and image kernels. Keep in mind that some videos may drastically increase in file size if the kernel reduces the compression rate of the video data.
Grading
The project will be graded as follows:
| Component | Percentage |
|---|---|
| Runs correctly with the identity kernel | 15 |
| Runs correctly with other three kernels | 75 (25% each kernel) |
| Writeup | 10 |
2D Stencil (CMSC616)
In this version of the assignment, you have to write a parallel implementation of an iterative stencil computation. We will use a two-dimensional (2D) Jacobi calculation to simulate heat diffusion. This calculation performs iterative sweeps (called timesteps) over a given array of values. The serial algorithm is described here and you have to implement its parallel version using CUDA.
Input/Initialization
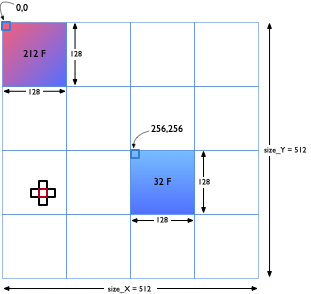
Your program should read in a file containing the values that will be used to initialize the 2D array of doubles. A sample file is available here. This sample input corresponds to the initial conditions in the figure on the right. Two regions of size 128x128 are assigned initial values of 212 and 32 degrees F respectively to denote hot and cold zones. All remaining array elements are assigned an initial temperature of 72 degrees F.
Serial Algorithm
At each timestep, the value in each cell (array element) is updated by averaging the values of its four neighbors and itself.
A[i, j] = (A[i, j] + A[i-1, j] + A[i+1, j] + A[i, j-1] + A[i, j+1]) * 0.2
You can assume periodic boundary conditions so the array elements at the edges will exchange data with elements on the opposite edge. For this assignment, the 2D Stencil matrix/array has a finite size. The x-axis starts at 0 and ends at X_limit-1 (supplied on the command line). Likewise, the y-axis starts at 0 and ends at Y_limit-1 (supplied on the command line).
GPU Algorithm
You are provided with starter code to handle reading/writing data from/to disk. Your job is to write two GPU kernels:
- padded_matrix_copy, which copies the current matrix/array into a previous_matrix (array)
- compute_on_gpu, which computes a single iteration of the 2D stencil computation.
- allocate_grid_on_device, which allocates the matrix on the device
- deallocate_grid_on_device, which deallocates the matrix on the device
- copy_grid_to_device, which copies the matrix from the host to device, and
- copy_grid_to_host, which copies the matrix from the device to host
The GPU kernels are structured as follows:
          __global__ void padded_matrix_copy(double *dst, double *src, int X_limit, int Y_limit, int padding)

          __global__ void compute_on_gpu(double *matrix, double *previous_matrix, int X_limit, int Y_limit)
Running
Your program should take seven command line arguments: the name of the data file, the number of iterations or timesteps, the X and Y sizes of the 2D array, grid size along X and Y, and the output file. To be more specific, the command line of your program should be:
./2d-stencil <input filename> <# of timesteps> <X_limit> <Y_limit> <gridSizeX> <gridSizeY> <output filename>
To request a GPU in your sbatch job script, add the following line to the top:
#SBATCH --gres=gpu:a100_1g.5gb
--gres=gpu:a100_1g.5gb argument when you run salloc.
Output
Your program should write a single file called <size_X>x<size_Y>-output.csv (from one designated rank) that contains comma separated values (up to three decimal points) of the 2D array. Each line in the file should correspond to one row of the array starting with i=0, j=0.
This is the correct output file for the sample input file above after 100 timesteps.
The only print from your program to standard output should be the GPU timing (up to three decimal places)
that looks like this:
TIME: 4.529 s
- Input 1 Output 1 size_X = 32, size_Y = 32, timesteps = 100
- Input 2 Output 2 size_X = 64, size_Y = 128, timesteps = 100
- Input 3 Output 3 size_X = 128, size_Y = 256, timesteps = 100
What to Submit
You must submit the following files and no other files:
2d-stencil.cu: starter code with the required CPU functions, and padded_matrix_copy and compute_on_gpu implemented.Makefilethat will compile your code successfully on zaratan when using nvcc. You can see a sample Makefile here. Make sure that the executable name is 2d-stencil, and do not include the executables in the tarball.- You must also submit a short report (
LastName-FirstName-report.pdf) with performance results (one line plot). The line plot should present the execution times to run the GPU version on the input file 512x512-input.csv (for different block sizes). You can change the block size by changing the blockDimSize variable. In the report, you should mention:- how you wrote the kernel
- how was the initial data distribution done
- what are the performance results, and are they what you expected
LastName-FirstName-assign4), compress it to .tar.gz
(LastName-FirstName-assign4.tar.gz) and upload that to gradescope.
Grading
The project will be graded as follows:
| Component | Percentage |
|---|---|
| Runs correctly with 32x32 board | 25 |
| Runs correctly with 64x128 board | 20 |
| Runs correctly with 128x256 board | 20 |
| Runs correctly with 512x512 board | 25 |
| Writeup | 10 |