|
Piccolo.NET: Out of the Box This tutorial
will help you figure out where to begin. It will guide you from
downloading Piccolo to writing and compiling your first zoomable
user interface.
1.
Get the Pre-Requisites
In order to write your first Piccolo.NET application, you will
need to make sure that you have the following:
- Visual Studio .NET
- This tutorial assumes that
you are using Visual Studio .NET as your development environment.
Visual Studio is not required to write Piccolo.NET applications,
but we do recommend using it. If you do not already have
Visual Studio, you can purchase
it from Microsoft.
- The .NET Framework
- To run any Piccolo.NET
code, you must have the .NET Framework (version 1.1)
installed on your machine. The .NET Framework SDK comes
with Visual Studio. If you do not have Visual Studio, you
can download the
.NET SDK directly.
- Piccolo.NET DLLs - Of course, you will need
Piccolo.NET. You can download the DLLs or the full source
code from the
download
page.
- Piccolo.NET Documentation - Optionally, you may
want to download Piccolo.NET's
integrated help.
This will enable context sensitive help within
the development environment.
Setting up the Environment
These steps will help you setup the Visual Studio environment
to improve the Piccolo.NET development experience.
2.
Install the Documentation
It will guide you through
installing the Piccolo.NET API documentation directly
into Visual Studio and will enable context sensitive help within
the development environment. If you do not want to install Piccolo.NET's integrated help, you
can skip to step 3.
- Make sure Visual Studio is closed.
- Locate the file "Piccolo-Help-1.0.zip," which you downloaded
in step 1. Extract the zipped package using WinZip or
another compression utility.
- Open the folder where you extracted the file and
double click on the "Piccolo Help Setup.msi" file.
- Follow the on-screen directions of the setup program.
- Open Visual Studio and click on the "Contents" option
of the "Help" menu, to display contents. You
will probably receive a message that "help is updating to reflect
your recent changes." It can take several
minutes to add all of the Piccolo.NET documentation to Visual
Studio. There should be an entry in the help contents called
"Piccolo.NET." You can now browse the documentation
through the contents or search it using the Index. You can
also use context sensitive help. For example, if you move
the cursor over the name of a Piccolo type, such as PNode, and
press
F1, you will get the documentation for that
type.
3. Add
PCanvas to the Toolbox
All Piccolo interfaces need to be placed in the piccolo
canvas, PCanvas,
so that they may be viewed and interacted with by the user. This step will show you how to add the
PCanvas to the Visual Studio Toolbox. This will
enable you to drag the canvas directly to a form using the Visual
Designer, rather than adding the canvas programmatically.

- Open Visual Studio, if it is not already open
- Make sure the Toolbox is showing. If it is not, click
on the "View" drop down menu and select the item named
"Toolbox".
- If you do not see a "Windows Forms" button on the Toolbox,
right click on the Toolbox and select "Show All Tabs".
- Press the "Windows Forms" button to show the windows forms
tools.
- Right click anywhere on the Toolbox and select "Add/Remove Items..."
from the popup menu.
- When the "Customize Toolbox" window pops up, click on the "Browse" button.
- Look in the folder where you downloaded the Piccolo Source or
Binaries. If you downloaded the source code, select the
"/Piccolo.NET/Bin/UMD.HCIL.Piccolo.dll". If you downloaded
the compiled source, select "/Bin/UMD.HCIL.Piccolo.dll".
Press the "Open" button.
- Press the "OK" button in the "Customize Toolbox" window.
- You should now see PCanvas at the bottom of the windows
forms tools. You may have to scroll down with the down
arrow to find it.
Building Your First ZUI
These steps will guide you through writing your first zoomable
user interface with Piccolo.NET.
4.
Create a new C# Windows Application Project
Here you will create a new Windows project.
- Open Visual Studio, if it is not already open.
- Select "New" from the "File" menu and choose "Project" from
the popup menu.
- Select File New ProjectCreate a new C# project
- Click the "Visual C# Projects" folder in the "Project
Types" window of the dialog box and choose "Windows Application"
in the "Templates" window.
- Enter a name and location for the project and click the
"OK" button.
5. Add References to Piccolo DLLs
These steps will add references to the Piccolo libraries so
that you can access the namespaces.
- Right click on the References folder in the Solution
Explorer and click "Add Reference."
- Click Browse
- Look in the folder where you downloaded the Piccolo Source or
Binaries. Look in the /Bin directory. Select both "UMD.HCIL.Piccolo.dll"
and UMD.HCIL.PiccoloX.dll" and click "Open".
- Click "OK" to add the references.
6. Add the Canvas
Next we will add the PCanvas the form in
the designer.
- Drag the PCanvas from the Toolbox to the Form in
the Visual Designer.
- In the Properties Window, click on the "Name" field
and type "canvas."
- Drag the handles on the Canvas to resize it to cover the entire Form
- Click on the "Anchor" field in the Properties
window, and click the down arrow to the right. When the
little box pops up, select the rectangles to the right and
bottom of the middle square. This will make the canvas
grow when the window is resized.
NOTE: As a shortcut, we could have just extended PForm,
a utility class in the UMD.HCIL.PiccoloX namespace that
automatically adds a PCanvas to a form and resizes the canvas when
the form is resized. See the tutorials that follow this one
for an example of how to do that.
7.
Write the Code
Now we will write our first Piccolo code.
- If the Designer is showing, press F7 to enter the
code view.
- At the top of the screen, under the using
statements, add the following:
using UMD.HCIL.Piccolo;
using UMD.HCIL.Piccolo.Nodes;
These lines reference the main Piccolo namespace and the Nodes namespace,
which contains the PText node that we will use below.
- In the Constructor after the call to
InitializeComponent(), add the following code:
PText text = new PText("Hello World");
canvas.Layer.AddChild(text);
That's it! You've just written your first zooming application.
The first line creates a new PText node and initializes it to the
string "Hello World". And, the second line adds the new node to the
main layer of the canvas. Zooming and panning are there for
free.
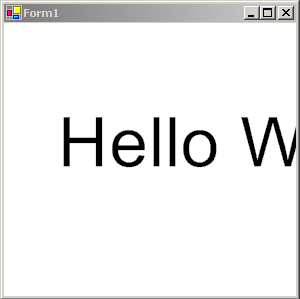
8. Run the Code
Now let's see Piccolo in Action
- Press F5 to run the project
- You should see the text "Hello World"
- Click anywhere in the window with the left mouse
button and drag to pan the camera around.
- Click anywhere in the window with the right mouse
button and drag to the right to zoom in on the point. Drag
to the left to zoom out.
The reason this works is because the zoom and pan event handlers
are installed by default. See the
Defining User Interaction tutorial
for more details.
|