Every screen on the Diamond Suit System provides a help
button that displays clarification and/or useful information regarding
the current screen. All screens, except for the Log In Screen provides
buttons on the top portion of the device that the user may press to
redirect to another action.
Log In Screen
Once the device is turned on, the Diamond
Suit prompts the user to enter his/her designated pin number. The pin
number is a four digit code programmed into the device by the Diamond
Suit’s owner, which is normally the physician. If a correct pin
is entered, the Home Page will automatically appear. However, if the
pin entered is incorrect, the user will be asked to try again. The Diamond
Suit System will not allow the user to proceed unless a correct pin
number is entered. If you do not know your pin number or need to change
your pin number, please contact your physician or the Diamond Suit owner.
This screen will not appear again until the next time the user turns
on the device.
Home Page Screen
The Home Page Screen displays the four possible actions: view current
work out session, view rehabilitation progress, view current body condition,
and changing setting options. The user is able to choose the action
by clicking on the large icons or pressing the buttons with corresponding
actions. Please see the action’s corresponding page for more information.
Work Out Screen
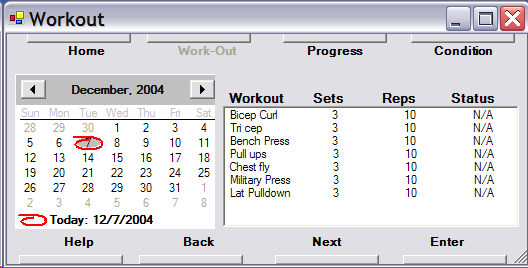
The Work Out Screen initially displays the current day’s work
out specifications. The screen displays the exercise, the number sets
recommended, number of repetitions per set recommended, and status of
the exercise. The exercise and recommended numbers are pre-programmed
into the device by the physician or the Diamond Suit owner. The status
indicates whether the exercise is In Progress, Completed, or Incomplete.
The user may browse through the exercise list by scrolling up and down
the list or pressing the next and back buttons. Once the user has selected
an exercise and pressed enter, the user is expected to complete the
selected exercise.
A screen will appear displaying the current exercise that should be
in progress. If weights are needed for the exercise, weight in pounds
will be displayed. The Diamond Suit will keep track of the number of
repetitions per set and number of sets the user has completed through
the many sensors positioned all over the suit. To proceed to the next
exercise, the user may press the button labeled, “Next Work-Out.”
To go back to the last exercise, the user may press the button labeled,
“Last Work-Out.” Once all the work outs have been completed,
the screen will return to the Work-Out Screen. If the user decides to
end the work out early, the user may press the button labeled, “Done,”
and return it to later time. However, the user may only complete exercises
assigned on the current day. By pressing on the button labeled, “Work-Out,”
it will return back to the Work Out Screen.
To view previous work out sessions, return to the Work Out Screen. Using
the calendar, the user is able to select a date and the work out on
the specified date will be displayed. If no work out session was created
for the specified date, the work out list will be blank. The user will
only be able to update on work out sessions assigned on the current
day. Previous and future work outs cannot be updated.
Progress Screen
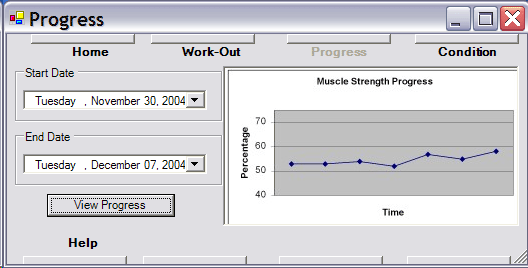
The Progress Screen exhibits a graph visualization of the user’s
muscle strength progress over a period of time. . The screen itself
is split up into two parts. On the left hand side, there are two drop-down
menu for a start date and a end date. The user chooses a date on both
calendars and on the right hand side there will be a line graph that
shows graphically how the user progressed between the two chosen dates.
The user can get a sense on how well their rehabilitation workout is
going over a long period of time. This presents the user with the necessary
information that they may be needed in case they want to change up their
workout due to the patterns that the line graph will project.
Condition
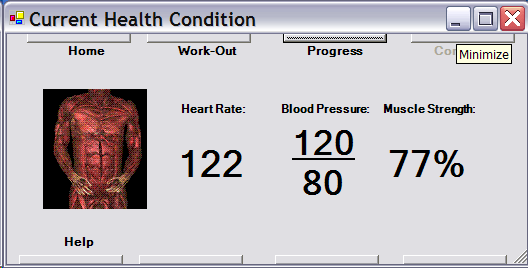
The Condition Screen exhibits the user’s current condition state.
The heart rate, muscle strength, and blood pressure are measured through
the suit’s sensors. At any time the Diamond Suit receives signals
of excessive stress on the body or muscle, the Diamond Suit will send
out a warning signal (by audio and visual) indicating that the current
work out must be terminated.
Settings Screen
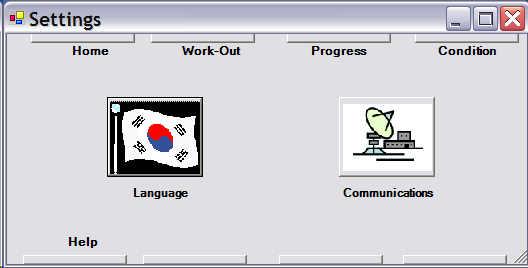
The Settings Screen can only be accessed through the Home Page Screen.
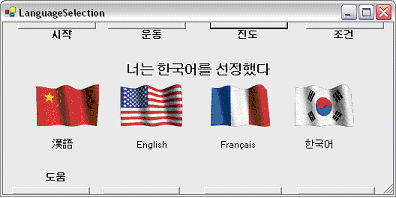
The user may be able to change the language of the text displayed,
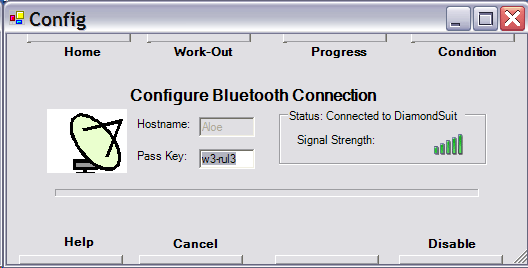
switch from right hand view to left hand view, and/or configure Bluetooth
Connection.
Diamond Suit offers a feature that allows the user to switch the
view of the interface. The left handed right handed toggle icon, will
toggle the interface so it is more suitable for left handed people
or to right handed people. The view depends on which arm (left/right)
the user prefers the device on. Setting which arm the user will use
allows the interface to position as needed.
The languages offered by Diamond Suit are Chinese, English, French,
and Korean. English is the defaulted language when the device is set
up. Once the language has been set, the device will remain in that language
until the next language selection change.
Diamond Suit offers Bluetooth Connection (wireless connection) to send
data from the hand-held device to the physician’s computer, and
vise versa. The patient, physician, physician’s computer, and
device all have an ID associated with them and all the IDs must match
correctly for the Bluetooth Connection to be validated. To enable the
connection, click on the “Enable” button and to disable
the connection, click on the “Disable” button.